Posts

Showing posts from November, 2016

Grand finale- 12 days of Christmas...

Image
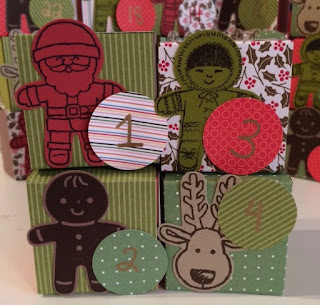
Sometimes, my best ideas come to me either as I am just nodding off to sleep, or in the middle of a really good sleep. I was contemplating what to do for the final day of my 12 days of Christmas, and realized that the kids have been asking for a countdown calendar to Christmas. Then, the wheels started spinning as to 1) how I was going to do it, 2) how I could do it on a smaller scale, and 3) how I can make one that could be easily stored. This advent calendar answers all of the questions. They are 2 inch squares, and, when taken apart, will fold completely flat. They will fit into a small size ziplock bag, ready for next year- WIN! The most tedious part of the task was scoring and cutting the paper. But, as with the snowman from yesterday, if you do all the scoring before you cut, it does reduce the amount of labour. I used retired cardstock and DSP for this one, as I have been trying to use up my stash. For this project, you will need five sheets of 8.5ex11 cardstock, and 4 sh

Card class sneak peek

Image
This 12 days of Christmas post gives a sneak peek into an upcoming class I'm offering on December 4. We'll be making 14 quick and easy Christmas cards out of one sheet of 12x12 patterned card stock. This one is probably the most complex out of the bunch. Supplies: Crumb cake cardstock 4.25x5.5 Candy Cane Lane DPS (2x4) White cardstock (1.75x3.25) Tin of Tags stamp set (snowflake) Christmas Magic stamp set (bells and sentiment) Real Red stamp pad Basic Black stamp pad Gold Wink of Stella Versamark stamp pad Stamp the snowflake several times using Versamark for a watermark-like look. Stamp the bells twice on a piece of white cardstock, colour with Wink of Stella for the bells and Real Red for the bow. Round the corners and adhere to the tag, which was punched using the Tag Topper punch. Adhere the tag to the card, and stamp the sentiment. For information about the card class, please check out my facebook page: facebook.com/stampinwithandrea. See you tomorrow

Do you want to build a snowman?

Image
Sorry- I couldn't resist. We are having our first snowfall of the season today, and it's perfect snowman making snow. It likely won't stay around long, but this little cutie will last the whole season! The kids and I headed to the craft space today and made this guy. I think there will be more in our future- you can make them any size at all, Supplies: Basic Black cardstock (8.5x11) White cardstock (12x12) Tangerine Tango cardstock (retired) Real Red cardstock To make your life easier, and production of this guy faster, score an entire piece of 12x12 at once- sore at the 1 inch mark. You'll need three pieces. Once scored, cut at 6 inches. Fan fold the pieces and adhere them together. Punch a 2 inch circle from white cardstock. This next bit takes a little coordination and perhaps an extra pair of hands. With a glue gun, run a bead of glue along the inside part of the circle (where the punched circle will sit, as with the image at righ). Push the paper togeth

Christmas ornaments

Image
A few years ago, I saw 3-D ornaments made out of paper, and I thought they were really cute. You can do them in any shape, as long as the template you are using is symmetrical. These are great for using up scrap pieces of paper, or paper that you are not overly fond of (we all have some of that lurking in our stash- purchased because it was an amazing deal, or came as part of a paper pack!) I have oodles of odds and ends laying around, and I thought it would be the perfect way to use up some paper, and give you ideas for the 12 days of Christmas- day 9. For the circle ornament, I used 6 Real Red 2-inch circles and 7 of the gumdrop paper from the Candy Cane Lane DSP pack. No matter the shape, all you need to do is find the centre point and either fold or score them in half. Tape the circles together, creating a book as you go. Attach the two end pieces to form the completed shape (you should end on a solid and patterned piece touching.) To finish, them, I attached a jingle bell to

Wine tags

Image
Quick and easy idea for you tonight. Wine tags. You can get 4 out of one sheet of cardstock, and they can be personalized in so many ways. For Today's 12 days of Christmas idea (day 8), I decided to use non-Christmas colours, and an old favourite stamp. Stamps used: Tin of Tags and Lovely as a Tree Colurs: Basic Black and Island Indigo ink, Island Indigo and white cardstock. Cut the cardstock to 8.5x 2.75 and score at the 2 inch mark. Close to the centre of the scored piece, punch a 3/4 inch hole. Cut the Island Indigo card stock to 2.75x 6.25. Cut white cardstock to 2.5x 6. On the bottom half of the white cardstock, stamp Lovely as a Tree image in Basic Black, then stamp again (without reinking) to get a 3-d effect. When you stamp the second time, move the stamp over slightly to add interest and dimension. To do the background, I scribbled some of the Island Indigo marker on a piece of plastic, and used a water brush to paint the sky.  Stamp the sentiment and punch out

Combining passions

Image
I have always loved creating. I enjoy pairing patterns, colour and texture, seeing what works together, and sometimes, those pairings can be surprising. Sitting at my desk this morning with papers spread in front of me looking for inspiration for day seven of my 12 days of Christmas, I immediately saw a quilt. I knew it would be easy coming up with a card for a close friend using the Candy Cane Lane DSP and Cookie Cutter Christmas stamp sets. The Stitched Shapes Framelits makes it super easy, too- a few runs through the Big Shot, and I had all the pieces ready to go. I love how the stitching on the Crumb Cake cardstock makes it look like suede The Stitched Shapes Framelits are so versatile- they come with square, round and oval- and quickly add that little bit of something to finish off a card quickly and easily! The sentiment came from Tin of Tags, and the Reindeer is from Cookie Cutter Christmas. I cut out the squares, adhered them to a piece of white cardstock, and th

Halfway- 12 days of Christmas, day 6

Image
I've always loved the look of these treat holders. They are a breeze to make, and are super cute. The patterns I have seen have always been a little on the small side, so, today, I decided to see what would happen by making them bigger.  Each treat holder is made with half a sheet of 8.5x11 paper, and will hold about 24 Hershey Kisses or  1 packet of hot chocolate mix and 8 peppermint patties.  Supplies for this project: Cardstock of your choice (I used Old Olive and Real Red) Double sided tape Goodies for the inside of the packages Cookie Cutter Christmas and Christmas Magic stamp sets Stampin' Up Regals markers Candy Cane Lane DSP Cut the cardstock, tape the edge Crimp, and tape the inside of the tube to create a cone. Burnish the end with a bone folder or your finger to ensure a good seal. Fill the holder with treats and tape the other side at a 90 degree angle from the first tape line. You should have one vertical and one horizontal seam. Decorate t

Coffee cup treat holders- 12 days of Christmas day 5

Image
There's tons of great ideas out there for quick and easy gifts. This is my spin on the ever-popular coffee cup treat holder. I found the cups at our local dollar store. I loved the colour of them, and decided to see what I could do with them. When I brought them home, I took it apart and discovered it was a sleeve around the white cup. I traced it in a scrap piece of paper to make a template, and then decided that I would measure down the top and the bottom by 1/2 an inch to create a sleeve template. From there, the decorations are up to your imagination! I love the way this one turned out. Supplies: Crumb Cake and Real Red cardstock Stampin' Up Regals markers Wink of Stella gold glitter pen Wink of Stella clear glitter pen adhesive Stampin' Up white chalk marker Baker's twine Christmas Magic stamp set Chocolate Chip ink pad Corner rounder Cut out the template from Crumb Cake cardstock. Cut a piece of cardstock slightly larger than the image. Sta

Charmed- 12 days of Christmas day 4

Image
It's no secret I love the Cookie Cutter Christmas stamp set. I've seen a few ideas around the Internet, and stumbled across earrings made from the set and shrinky dinks. They are so cute, and I decided to make some for my daughter... then the ideas started churning. We have a huge bucket of beads at our house- I was looking at some of them today, and decided that they looked like Christmas ornaments. If you follow me on Facebook ( www.facebook/stampinwithandrea ), you'll see a teaser I put up for this idea. I loved the way the beads looked in the glass, and it reminded me of a huge jar of Christmas decorations. The holidays are coming, and with them, lots of parties and gatherings. Wine charms are the perfect hostess gift or to include with a bottle of wine. These serpentine wine charms can be coiled around the stem of the glass, or simply looped. I enlisted help from the littles- they helped with stringing the beads- excellent for teaching repetitive patterns and f

12 Days of Christmas- Day 3

Image
I love gift cards. I love getting them, I love giving them. One of the best Christmas gifts I gave my husband was a year of dates. I got a cheap little dollar store calendar, and filled it with gift cards for every month- dinner and an activity. It was tons of fun, and we tried all kinds of new places. I know some people don't like giving gift cards, but for me- it's a double gift- the thoughtfulness of someone, plus a shopping trip! These super cute gift cards are quick and easy to whip up, and you can get four from a single sheet of 8.5x11 cardstock. Supplies: Cookie Cutter Christmas stamp set and punch Lovely as a Tree stamp set Candy Cane Lane DSP Tin of tags stamp set Stampin' Up markers Cut cardstock at 2.75 x 11. Score at 4 inches and 8 inches. Run tape down the two sides of the longer scored piece and tape closed. Cut DSP for the front (two pieces cut to 2.5x3.75), and adhere. Stamp and punch images for the front, and add the sentiment of your choi

Hot chocolate gifts...

Image
It's been rainy here all day. There's nothing I love more on a cool rainy day than curling up with a good book and a cup of hot chocolate. Well, maybe there's something I love slightly more... creating in my loft! There's lots of patterns in Internet land for these hot chocolate packets. I wanted something quick and easy that the kids and I could make together to send out for Christmas. These fit the bill. They required few supplies, and minimal time. You could make enough for a whole classroom of children in under an hour, I'd bet! On to day two of the 12 Days of Christmas 2016!  Supplies used: Christmas Wishes stamp set Stampin' Up markers- (I used the Regals set) Plain cardstock (Real Red and Chocolate Chip here) Candy Cane Lane DSP Tag Topper punch Cut cardstock to 6x6. Measure three inches across one side and mark it. Do the same on the other side and draw a faint line.  Mark the centre with a small dot. (You can just see the dot on the sample

I'm inspired...

Image
It's funny how excited I get when I come home, and there's a brown cardboard box waiting outside for me. I got another box of goodies from Stampin' Up this week- and included was my new-found love- the tag topper punch. Oh my, how I am loving this thing! I whipped up a couple of tags yesterday, and then today, spent some time making chocolate holder gift tags for a craft sale on the weekend.  I decided, since I have so many quick and easy projects on the go at the moment, I'd start a 12 days of Christmas feature on the blog. Most that I will be sharing over the next two weeks are quick and easy. Instructions will be included for all.  Up first is this little gem: gift tags that hold a little extra surprise for the recipient- a small chocolate.  Supplies used: SU cardstock Cookie Cutter Christmas stamp set and punch Christmas Magic stamp set (snowman) Tin of Tags stamp set (to and from)  Tag topper punch Chocolate chip stamp pad Basic Black stamp

Welcome, baby!

Image
A coworker of my husband and his wife recently welcomed a little boy, and the request was made to create a card for them. I have been using Cookie Cutter Christmas a lot lately, and had no idea if/when I would ever use the bear... well, it turns out that it was perfect for a baby card. The embossing folders I used for the white card and the blue circle are not Stampin' Up, but everything else is. The bear is stamped in Chocolate Chip and cut out by hand. I added tiny black brads for the eyes. The paper is Island Indigo (it's rapidly becoming one of my favourite colours!) The sentiment is from the Tin of Tags set. I attached the bear onto the card with dimensionals, and rounded the corners of the sentiment... all in all, it was a pretty easy card to create. My son was home sick from school today, and he was "helping." He proclaimed the card "pretty cute," and commented that the baby is pretty lucky to be getting such a cool card. I hope that my husband&

Quick and easy Christmas crafts

Image
I decided that I needed to whip up a couple more items for this weekend's craft sale. These were super fast and easy. They'd make great teacher gifts, a little something extra to slip into a gift bag, or a little treat for someone, just because!  These little peppermint patty trios are so cute, especial the gingerbread men. I am seriously loving the versatility of the Cookie Cutter Christmas stamp set and coordinating punch. So many possibilities, and the punch makes any project quick and easy (I also used the punch for the bowtie and hair bow). The sentiment with the gingerbread people is from the Christmas Magic set, (which is the same set that the snowman is from). The sentiment and the snowflake are from the Tin of Tags set. These trees are ADORABLE, and I am so, so happy that I found a super easy tutorial online. Click here to check it out. . I've been poking around Qbee's Quest, and there are SO MANY ideas on the site, it's overwhelming. Brenda is amazin