I'm inspired...
It's funny how excited I get when I come home, and there's a brown cardboard box waiting outside for me. I got another box of goodies from Stampin' Up this week- and included was my new-found love- the tag topper punch. Oh my, how I am loving this thing! I whipped up a couple of tags yesterday, and then today, spent some time making chocolate holder gift tags for a craft sale on the weekend.
I decided, since I have so many quick and easy projects on the go at the moment, I'd start a 12 days of Christmas feature on the blog. Most that I will be sharing over the next two weeks are quick and easy. Instructions will be included for all.
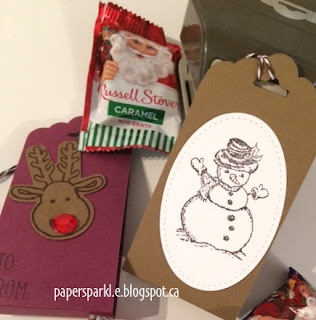
Up first is this little gem: gift tags that hold a little extra surprise for the recipient- a small chocolate.
Happy crafting!!
I decided, since I have so many quick and easy projects on the go at the moment, I'd start a 12 days of Christmas feature on the blog. Most that I will be sharing over the next two weeks are quick and easy. Instructions will be included for all.
Up first is this little gem: gift tags that hold a little extra surprise for the recipient- a small chocolate.
Supplies used: SU cardstock
Cookie Cutter Christmas stamp set and punch
Christmas Magic stamp set (snowman)
Tin of Tags stamp set (to and from)
Tag topper punch
Chocolate chip stamp pad
Basic Black stamp pad
Stitched Shapes framelits * right now, selected coordinating stamp sets are 25% off (until November 30)- for more information- please leave a comment or email me!*
Guys- can I tell you how seriously awesome the Stitched Shapes Framelits are?? It includes square, oval and circle. They are perfect for adding a little finishing touch to your project without muss or fuss. If I am being totally candid, I have to say I don't get sewing on cards. It's not something that I particularly like. However, I ADORE this little detail the Stitched Shapes Framelits give. If you want, you could pull thread through the holes and add a little stitching detail, or do faux stitching with a pen, or just leave it plain. The possibilities are endless. They nestle well, too, so you can add layers, or with a plain punch, you can add a little dimension. (that will be illustrated soon in another project.)
Here's a close-up of the detail:
Now- onto the details:
- Cut cardstock to 2 inches by 8.5 (you'll get 5 from one sheet).
- Punch both ends of the card with the Tag Topper punch.
- Score the tag at 4 and 4.5 inches- fold the score lines.
- Run a little bit of tape on the back to hold the candy in position.
- Loop a length of baker's twine through the holes and tie.
- Decorate as desired.
Happy crafting!!


Comments
Post a Comment