Posts

Showing posts from October, 2020

One Sheet Wonder- Brightly Gleaming

Image
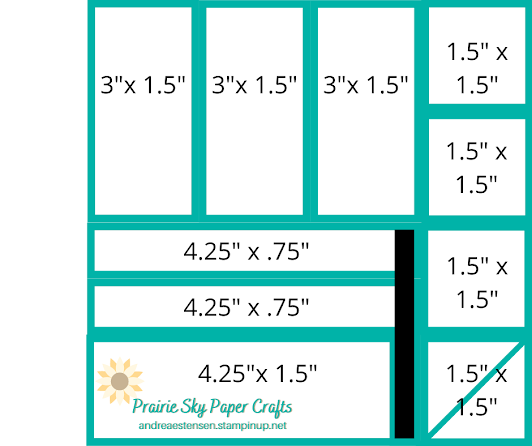
 Hello crafters! Today, I want to share a one-sheet wonder that I created with a 6x6 inch piece of Brightly Gleaming patterned paper. For this project, you'll need: 1 6x6 sheet of paper of your choice, paper trimmer, coordinating card stock, card bases, and card front layers, stamp set, stamp block, dimensonals, Stampin' Seal, and and ink pad. Be sure to scroll to the bottom for full instructions.   Card A: Very Vanilla card base, Old Olive cut at 4.25 x 2.75", and one 1.5" square cut on the diagonal.     Card B: Very Vanilla card base, three 1.5 x 1.5" squares of patterned paper,  Night of Navy cut at 1 x 5.5"     Card C: Very Vanilla card base, Old Olive cut 4.25 x 2.75", two 4.25 x .75: strips of patterned paper. at For   Card D: Very Vanilla card base, Old Olive cut at 5 x 3.25, three 1.5 x 3" strips of patterned paper.   Card E: Very Vanilla card base, Not Quiet Navy cut at 2 x 4.25", 1.5 x 4.25" strip of patterned paper. Check out t

Forever Fern- block stamping

Image
Today, we're going tosit back, relax, and SIP. SIP is an acronym for Stamps, Ink, Paper. This technique is incredibly easy, though can lead to inky fingers. I had so much fun creating the cards today that I forgot to take pictures of each step, so, you'll notice that I've used a couple of colours... same technique, just different cards.   Assemble your supplies. For this tutorial, I used the Forever Fern stamp set, Cajun Craze and Mossy Meadow ink, Whisper White, Cajun Craze, and Mossy Meadow cardstock, Stampin' Seal, a mini mister, and stamp blocks. The Whisper White cardstock was cut to 4 x 5 1/4" and the coloured cardstock was cut at 4 1/4 x 5 1/2.   Here's where it gets messy! Ink up your stamp block. For the smaller blocks, simply lay the block on the pad and ensure that it's well covered. It can be easier for the larger blocks to lay the block down, and tap it with the ink pad. It doesn't have to be perfect. For the next step, grab your mini mist