Posts

12 Crafts of Christmas- Day 12 gift box

Image
Need a quick gift idea? These boxes come together quickly and easily. All you'll need is a 7 x 10" piece of cardstock, some patterned paper and a stamp sentiment.  Take your cardstock and score on the short side at 1/2, 1 1/2, 5 1/2 and 6 1/2 inches. On the long side, score at 5 and 6 inches. Cut the tabs as shown in the video. cut the patterned paper 1/4 inch smaller than the box front and back.  Stamp the sentiment on the tag strip and adhere to the front of the box using dimensionals, and decorate as desired.  Check out the video here. Check out all of our projects as the 12 days continue here: bit.ly/3oXmsLB For more ideas and inspiration, be sure to check out my other s ocial media channels here .

12 Crafts of Christmas day 10- twist and close box

Image
 Today's project is a fun twist (ha!) on a gift box. While it looks challenging, it's really quite simple to put together, and all you need is cardstock, patterned paper, adhesive, a ruler and stylus or scoring tool. Trim 1/2 inch from your cardstock so you're left with an 8 1/2 x 10 1/2 piece. Score on the long edge at 2 1/2, 5, 7 1/2, and 10 inches. Score the short side at 2 1/2 inches, flip, and score the other side at 2 1/2 inches.  Mark one side as shown 1 1/4 inches from each score line, and score from the mark to the bottom corner. Fold and burnish to crease.  Cut the bottom of the box as shown to the bottom score line. Discard the small tab at the bottom.  Cut your patterned paper to 4 3/4 x 2 1/4. Run adhesive along the side and connect the two edges. Apply adhesive on the bottom edges and seal the box. Working from one side, pinch the top closed, and your box is done!  Check out the video here. Check out all of our projects as the 12 days continue here: bit.ly/3oX

12 Crafts of Christmas- Day 8 faux woodburing

Image
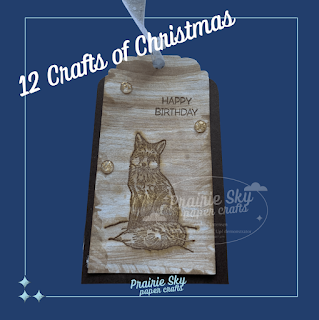
  Welcome back! For today's project, I am going to show you a fun way to add some dimension to a monotone card. I'm using Nature's Beauty, Early Espresso ink, and paper from the In Good Taste paper pack. You'll also need a water brush, some ribbon and gems, if you'd like to bling up your project. The tag can be any length you like, but the maximum width for the punch I am using is 2 inches. You want to be sure your paper is fully dry before you attach it to the cardstock layer to prevent it from pulling up. Check out the video here. Check out all of our projects as the 12 days continue here: bit.ly/3oXmsLB For more ideas and inspiration, be sure to check out my other s ocial media channels here .

12 Crafts of Christmas- day 6 recipe book

Image
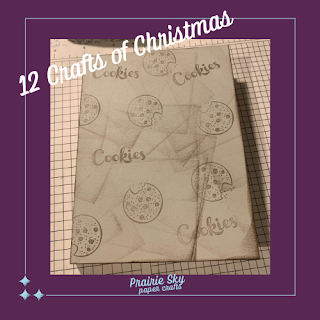
Wow. We're halfway through our 12 Crafts of Christmas already! Today, I have a sweet recipe book for you to give to a loved one. Envelope books are quick and easy, and can be used for a variety of things, including recipes, photos, mini scrapbooks, and more.  The Nothing's Better Than stamp set is the perfect one for this project, and, you can amp up your project using the coordinating dies.  For this project, you'll need envelopes, card stock, patterned paper, and adhesive. It really does come together quickly and easily once you stack the envelopes.  For the cover, simply measure your envelopes, and add 1/4 inch to the height and width of the cardstock, and then measure the spine to figure out the score line for that.  If your envelopes are 4 1/4 x 5 1/2, with a 1/2 inch spine, your cardstock would be cut to 5 3/4x 9, and scored at 4 1/2, and 5. Check out the video here. Check out all of our projects as the 12 days continue here: bit.ly/3oXmsLB For more ideas and inspirat

12 Crafts of Christmas day 4

Image
Welcome back for day four of the 12 Crafts of Christmas collaboration! I loved Stephanie's project yesterday. Today, I am working on a card that is simple and sweet. Using the Gingerbread and Peppermint designer series paper, and an idea from a card in the holiday catalogue, this card comes together quickly and easily.  It's simply paper, layered with the mittens cut out of the paper, a tag with a sentiment attached, and some ribbon. Check out the video here. Check out all of our projects as the 12 days continue here: bit.ly/3oXmsLB For more ideas and inspiration, be sure to check out my other s ocial media channels here .

12 Crafts of Christmas- Day 2

Image
  My friend Stephanie from Chalk Couture and I are doing a 12 Crafts of Christmas collaboration over the next little bit. This is my project, which can be added to her snowman soup cup from yesterday.  The Snowman Season stamp, coloured with watercolour pencils is a cute and quick card on its own, but when you add a little bit of heat embossing with white embossing powder, it adds a little bit more interest and texture to the card.  Check out the video here: https://youtu.be/y8RoAFZmKLc Check out all of our projects as the 12 days continue here: bit.ly/3oXmsLB Supplies used: Snowman Season stamp set, Memento Tuxedo Black ink, versamark, white embossing powder, gems, Night of Navy cardstock, Basic White cardstock, watercolour pencils, Stampin' Trimmer.