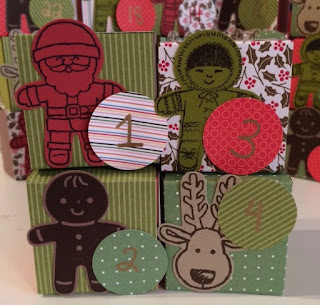
Grand finale- 12 days of Christmas...
 Sometimes, my best ideas come to me either as I am just nodding off to sleep, or in the middle of a really good sleep.
I was contemplating what to do for the final day of my 12 days of Christmas, and realized that the kids have been asking for a countdown calendar to Christmas. Then, the wheels started spinning as to 1) how I was going to do it, 2) how I could do it on a smaller scale, and 3) how I can make one that could be easily stored. This advent calendar answers all of the questions. They are 2 inch squares, and, when taken apart, will fold completely flat. They will fit into a small size ziplock bag, ready for next year- WIN!
The most tedious part of the task was scoring and cutting the paper. But, as with the snowman from yesterday, if you do all the scoring before you cut, it does reduce the amount of labour.

I used retired cardstock and DSP for this one, as I have been trying to use up my stash.
For this project, you will need five sheets of 8.5ex11 cardstock, and 4 sheets of 12x12 patterned cardstock.
The solid cardstock will be the inside of the box. Put the short side of the cardstock at the top of your score board and score it at 1 7/8, 3 7/8, 5 7/8 and 7 7/8.
Cut the pieces to 2x8.5.
Fold the score lines and burnish them with your fingernail or a bone folder. Run some double sided tape along the shortest tab and adhere it to the other side, creating a square.
Take the 12x12 sheets, and cut them to 8.5x12 (you'll have to take 3.5 inches off one side of the paper).

Score each piece at the 2, 4, 6, and 8 inch marks. Burnish the folds with your fingernail or bone folder. Adhere the tab to the side to form a square, as you did for the patterned paper.
Tuck the solid carstock box into the patterned box, and decorate as you wish. To keep it simple, I just stamped the Cookie Cutter Christmas characters on the coordinating cardstock and punched the circles from the patterned cardstock and wrote the numbers on them.
The gingerbread boy and reindeer were stamped in Chocolate Chip, and the child and Santa were stamped in Basic Black. The numbers were written with a Sharpie.
 The boxes will be filled little treats, or coupons for activities. I am going to put little magnets inside of them, and place the boxes on our back door for the kids to open, starting on Thursday. It's hard to believe that December is only a few days away!
Happy crafting!


Comments
Post a Comment