Posts

Inspiration in a pile of scraps
Image
Yesterday, I was doing some project ideas for the catalogue launch I'm holding January 4, and of course, there was a huge pile of scraps on the desk when I was finished. I don't normally hold on to smaller pieces of scrap paper, because I find them hard to use. But, sometimes, I leave them on my desk because I may have a use for them. When I finished crafting for the day, I walked out of my space and just shut the door, thinking I'd get back to it today. Well, I didn't. I couldn't find the inspiration, so, instead, I decided to organize all my 8.5x11 cardstock by colour. I happened to find some large zip-top plastic bags today, and arranged them all by colour. I am so happy it's organized now, and I can find exactly the colour I want. After I finished that task, I was going to start stamping and creating for a few card classes I have scheduled for January, but I couldn't get into it today. Some days, I have no problem coming up with ideas- one thing spi...

New toys!

Image
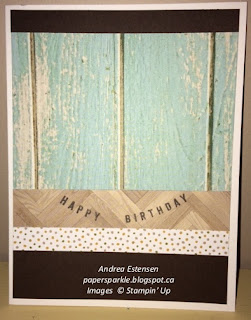
I've finally been able to play with the big box of goodies I ordered to preview the Occasions catalogue and the goodies from Sale-A-Bration (SAB) (which starts January 4). One of my New Year's resolutions is going to be to actually send the cards I make- regardless if there's an occasion or not. It would brighten someone's day to get a card for no reason. It's always nice to get something other than bills! I took advantage of some uninterrupted craft time this morning while hubby took the littles for a pre-Christmas errand. This card combines goodies from the new Occaisions catalogue, SAB and the regular catalogue. This card also gave me the chance to play with the new watercolour pencils Stampin' Up is reintrocuding. I have to admit- I wasn't sure how I would like them- I am more of an ink and aquapainter girl, but I do love how easy they were to use- lighter or harder pressure leads to easy shading, and then using the blender pen gave the flowers just...

Finishing touches

Image
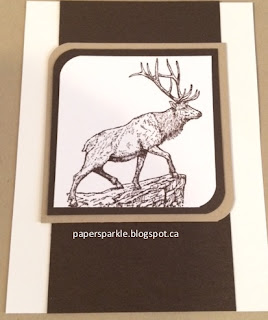
I wanted to design a card today for a former co-worker who is going through some fairly serious health concerns lately, to let him know I've been thinking about him. He enjoys outdoor adventures and nature, and I thought that this would suit him well. It's easy for me to come up with feminine cards, or cards for kids, but sometimes, cards for men take a few trips back to the drawing board. First, I was thinking about doing something with a watercolour background, but that didn't sit with the vision in my head. So, I got up, wandered around my craft space, and started pulling out cardstock. I love browns, and had Chocolate Chip and Crumb Cake close at hand, and that was my jumping off point. When it was finished, and layered, I decided that it needed a textural element, so I ran it through my Big Shot and gave it a the finishing touches. Sometimes, it takes a little time to hit on the winning design. Once everything clicks, things come together easily.  Materials: ...

Grand finale- 12 days of Christmas...

Image
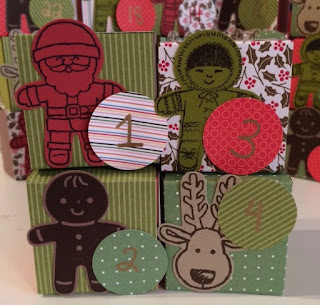
Sometimes, my best ideas come to me either as I am just nodding off to sleep, or in the middle of a really good sleep. I was contemplating what to do for the final day of my 12 days of Christmas, and realized that the kids have been asking for a countdown calendar to Christmas. Then, the wheels started spinning as to 1) how I was going to do it, 2) how I could do it on a smaller scale, and 3) how I can make one that could be easily stored. This advent calendar answers all of the questions. They are 2 inch squares, and, when taken apart, will fold completely flat. They will fit into a small size ziplock bag, ready for next year- WIN! The most tedious part of the task was scoring and cutting the paper. But, as with the snowman from yesterday, if you do all the scoring before you cut, it does reduce the amount of labour. I used retired cardstock and DSP for this one, as I have been trying to use up my stash. For this project, you will need five sheets of 8.5ex11 cardstock, and 4 sh...

Card class sneak peek

Image
This 12 days of Christmas post gives a sneak peek into an upcoming class I'm offering on December 4. We'll be making 14 quick and easy Christmas cards out of one sheet of 12x12 patterned card stock. This one is probably the most complex out of the bunch. Supplies: Crumb cake cardstock 4.25x5.5 Candy Cane Lane DPS (2x4) White cardstock (1.75x3.25) Tin of Tags stamp set (snowflake) Christmas Magic stamp set (bells and sentiment) Real Red stamp pad Basic Black stamp pad Gold Wink of Stella Versamark stamp pad Stamp the snowflake several times using Versamark for a watermark-like look. Stamp the bells twice on a piece of white cardstock, colour with Wink of Stella for the bells and Real Red for the bow. Round the corners and adhere to the tag, which was punched using the Tag Topper punch. Adhere the tag to the card, and stamp the sentiment. For information about the card class, please check out my facebook page: facebook.com/stampinwithandrea. See you tomorrow ...

Do you want to build a snowman?

Image
Sorry- I couldn't resist. We are having our first snowfall of the season today, and it's perfect snowman making snow. It likely won't stay around long, but this little cutie will last the whole season! The kids and I headed to the craft space today and made this guy. I think there will be more in our future- you can make them any size at all, Supplies: Basic Black cardstock (8.5x11) White cardstock (12x12) Tangerine Tango cardstock (retired) Real Red cardstock To make your life easier, and production of this guy faster, score an entire piece of 12x12 at once- sore at the 1 inch mark. You'll need three pieces. Once scored, cut at 6 inches. Fan fold the pieces and adhere them together. Punch a 2 inch circle from white cardstock. This next bit takes a little coordination and perhaps an extra pair of hands. With a glue gun, run a bead of glue along the inside part of the circle (where the punched circle will sit, as with the image at righ). Push the paper togeth...

Christmas ornaments

Image
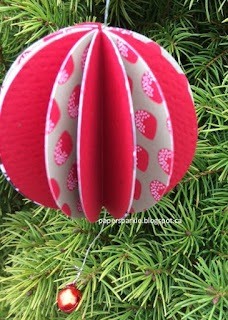
A few years ago, I saw 3-D ornaments made out of paper, and I thought they were really cute. You can do them in any shape, as long as the template you are using is symmetrical. These are great for using up scrap pieces of paper, or paper that you are not overly fond of (we all have some of that lurking in our stash- purchased because it was an amazing deal, or came as part of a paper pack!) I have oodles of odds and ends laying around, and I thought it would be the perfect way to use up some paper, and give you ideas for the 12 days of Christmas- day 9. For the circle ornament, I used 6 Real Red 2-inch circles and 7 of the gumdrop paper from the Candy Cane Lane DSP pack. No matter the shape, all you need to do is find the centre point and either fold or score them in half. Tape the circles together, creating a book as you go. Attach the two end pieces to form the completed shape (you should end on a solid and patterned piece touching.) To finish, them, I attached a jingle bell to...