Posts

New home...

Image
I hope you'll come visit me at www.andreaestensen.ca    

12 Crafts of Christmas- Day 12 gift box

Image
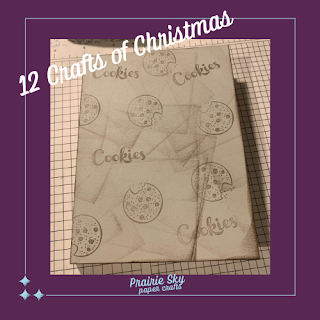
Need a quick gift idea? These boxes come together quickly and easily. All you'll need is a 7 x 10" piece of cardstock, some patterned paper and a stamp sentiment.  Take your cardstock and score on the short side at 1/2, 1 1/2, 5 1/2 and 6 1/2 inches. On the long side, score at 5 and 6 inches. Cut the tabs as shown in the video. cut the patterned paper 1/4 inch smaller than the box front and back.  Stamp the sentiment on the tag strip and adhere to the front of the box using dimensionals, and decorate as desired.  Check out the video here. Check out all of our projects as the 12 days continue here: bit.ly/3oXmsLB For more ideas and inspiration, be sure to check out my other s ocial media channels here .

12 Crafts of Christmas day 10- twist and close box

Image
 Today's project is a fun twist (ha!) on a gift box. While it looks challenging, it's really quite simple to put together, and all you need is cardstock, patterned paper, adhesive, a ruler and stylus or scoring tool. Trim 1/2 inch from your cardstock so you're left with an 8 1/2 x 10 1/2 piece. Score on the long edge at 2 1/2, 5, 7 1/2, and 10 inches. Score the short side at 2 1/2 inches, flip, and score the other side at 2 1/2 inches.  Mark one side as shown 1 1/4 inches from each score line, and score from the mark to the bottom corner. Fold and burnish to crease.  Cut the bottom of the box as shown to the bottom score line. Discard the small tab at the bottom.  Cut your patterned paper to 4 3/4 x 2 1/4. Run adhesive along the side and connect the two edges. Apply adhesive on the bottom edges and seal the box. Working from one side, pinch the top closed, and your box is done!  Check out the video here. Check out all of our projects as the 12 days continue here...

12 Crafts of Christmas- Day 8 faux woodburing

Image
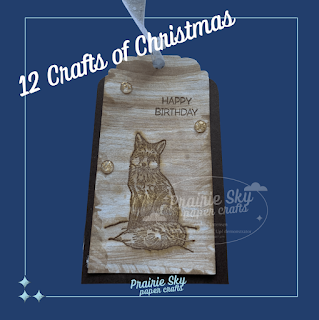
  Welcome back! For today's project, I am going to show you a fun way to add some dimension to a monotone card. I'm using Nature's Beauty, Early Espresso ink, and paper from the In Good Taste paper pack. You'll also need a water brush, some ribbon and gems, if you'd like to bling up your project. The tag can be any length you like, but the maximum width for the punch I am using is 2 inches. You want to be sure your paper is fully dry before you attach it to the cardstock layer to prevent it from pulling up. Check out the video here. Check out all of our projects as the 12 days continue here: bit.ly/3oXmsLB For more ideas and inspiration, be sure to check out my other s ocial media channels here .

12 Crafts of Christmas- day 6 recipe book

Image
Wow. We're halfway through our 12 Crafts of Christmas already! Today, I have a sweet recipe book for you to give to a loved one. Envelope books are quick and easy, and can be used for a variety of things, including recipes, photos, mini scrapbooks, and more.  The Nothing's Better Than stamp set is the perfect one for this project, and, you can amp up your project using the coordinating dies.  For this project, you'll need envelopes, card stock, patterned paper, and adhesive. It really does come together quickly and easily once you stack the envelopes.  For the cover, simply measure your envelopes, and add 1/4 inch to the height and width of the cardstock, and then measure the spine to figure out the score line for that.  If your envelopes are 4 1/4 x 5 1/2, with a 1/2 inch spine, your cardstock would be cut to 5 3/4x 9, and scored at 4 1/2, and 5. Check out the video here. Check out all of our projects as the 12 days continue here: bit.ly/3oXmsLB For more ideas and i...

12 Crafts of Christmas day 4

Image
Welcome back for day four of the 12 Crafts of Christmas collaboration! I loved Stephanie's project yesterday. Today, I am working on a card that is simple and sweet. Using the Gingerbread and Peppermint designer series paper, and an idea from a card in the holiday catalogue, this card comes together quickly and easily.  It's simply paper, layered with the mittens cut out of the paper, a tag with a sentiment attached, and some ribbon. Check out the video here. Check out all of our projects as the 12 days continue here: bit.ly/3oXmsLB For more ideas and inspiration, be sure to check out my other s ocial media channels here .

12 Crafts of Christmas- Day 2

Image
  My friend Stephanie from Chalk Couture and I are doing a 12 Crafts of Christmas collaboration over the next little bit. This is my project, which can be added to her snowman soup cup from yesterday.  The Snowman Season stamp, coloured with watercolour pencils is a cute and quick card on its own, but when you add a little bit of heat embossing with white embossing powder, it adds a little bit more interest and texture to the card.  Check out the video here: https://youtu.be/y8RoAFZmKLc Check out all of our projects as the 12 days continue here: bit.ly/3oXmsLB Supplies used: Snowman Season stamp set, Memento Tuxedo Black ink, versamark, white embossing powder, gems, Night of Navy cardstock, Basic White cardstock, watercolour pencils, Stampin' Trimmer.

How does it measure up?

Image
Measure twice, cut once. We've all heard that saying. And, over the years, I have learned that sometimes, it takes more than two measures to get it right ! There are some measurements that are easy to figure out, but when you get to some fancy folds, or 3D items, you need to get familiar with the smaller increments- and that sometimes can be a challenge. I know it is for me!  If you're new to cardmaking, this handy guide will help you out, too. You can check out the video here. Most of the time, card and scrapbook design measurements in North America are given in inches. It can get tricky when you’re not sure what the tick marks on the Stampin' Trimmer mean. I have been paper crafting for ages, and I still need to count, and recount, before I cut anything that isn’t the typical 1/4 or 1/2 inch measures. The diagram shows the ruler on the Stampin’ Trimmer, which measures to 1/16 of an inch. The 1/16 measure is the shortest, then 1/8”, 1/4”, 1/2” and the one inch mark is the ...

I had an idea...

Image
I was thinking about ways to use some of the new product in the fall and winter Stampin' Up! mini catalogue, when an idea hit.  The texture and interest the Snowy White velvet paper lends to projects is amazing. I loved the red velvet in last year's, and I think I love the white even more. Granted, I was a little nervous, because velvet attracts every bit of fluff near it, and white... well, let's just say my accident-prone self doesn't own anything white.  Enter the idea. I wanted to create a snowy background with dimension. I grabbed my Basic Boarders dies, cut out the clouds on a piece of scrap, and used that for the base. Then I grabbed my blending brushes, Balmy Blue and Grey Granite ink pads, and did the sky and snow. You can check out the video here .  Once the sky and snow were inked, the snowflakes were stamped with Balmy Blue ink, and then the snowman was assembled and adhered to the velvet paper with dimensionals.  Three pieces of mesh ribbon were added to...

One sheet wonder

Image
One sheet wonder cards are so much fun to make. This template will create 10 cards. I have added coordinating cardstock, as well as some Basic Rhinestones to add some shine. The Double Oval Punch was also used for some of the cards. All the sentiments were stamped in Memento Black ink.  You can download the cutting template here . The layout is here . In my video, I referenced the cost of making your own cards. Check out the video on YouTube . Breaking it down: 2021-2023 In Colour cardstock- $12.25 (20 sheets, 8 1/2 x 11") Basic White cardstock-  $13.25 (40 sheets, 8 1/2 x 11") Designer Series Paper $15.75 (12 sheets, 12 x 12") Clear envelopes $8.25 (50) Basic White envelopes $10.25 (40) You can get 80 cards from a pack of Basic White cardstock, which could create several cards. If you paired the carstock with a stamp set that has sentiments for many occasions, like Peaceful Moments ($29), you can quickly and easily make cards for any occasion. The cost for 80 cards, inc...

Designer Series Paper 12 x 12 gift holder

Image
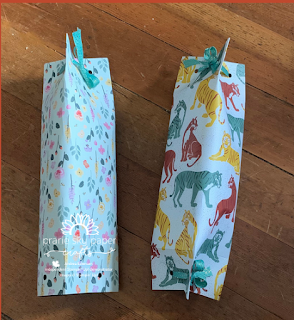
 Quick and easy project for you today- no cutting, no stamping, and you'll end up with a nice, large gift bag. Check out the video here. It'll take you about 10 minutes, and you'll be out the door with a unique bag in hand.  Supplies needed:  12 x 12 sheet of Designer Series Paper (Pansy Petals and In The Wild were used for the examples.) Ribbon Scissors Adhesive (I used Stampin' Seal) Hole punch Take your piece of 12 x 12 paper, and score horizontally at 2 inches on the top and bottom. Score vertically from the edge of the paper to the 2" score line at 3 3/4", 7 1/2", and 11 1/4".  Pinch the score lines so they are visible, and then run tape or glue from the top to bottom of the paper on the 3/4 inch tab. Line up the left side of the paper to the score line, and press to create a tube (ensure the tab is on the inside of the tube. Pinch the tabs together, and then punch one hole roughly in the centre of each- there will be three holes on each end. Th...

Crafting on the go

Image
Every year before we moved back to Manitoba, we'd load the kids, the pets, and whatever we'd need for several weeks away from home and drive half-way across the country for our summer visit. When we were home for the summer, I would also run a card class, so that meant bringing everything I would need for that. Usually, it involved a tote full of crafting goodies. I got REALLY good at packing, and using up every inch of space. If you're going on a road trip, want something to keep you busy while you wait for an appointment, or just need something for a rainy (or too hot) day, a grab and go kit is the way to go!  Check out the video to see everything that went into my kit.  Now, the absolute easiest way to accomplish this is with one of the Kit Collection kits- it includes everything you need, and the only extras you might want to tuck into the box is a stamp block, and pair of snips. Paper Pumpkin is also a great on-the-go kit, and with the first kit you get, you'll ...

#simplestamping Poppy Parade

Image
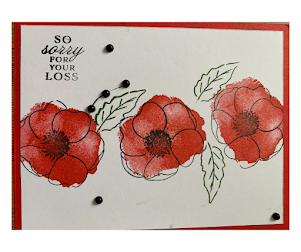
I've been in a bit of a red and white mood this week... today, I decided I needed to play with Poppy Parade, and the Painted Poppies stamp set.  The two cards were both done with Poppy Parade and Memento Black ink, and Black Matte Dots. Check out the video here to see how I did it! Shopping list: Poppy Parade cardstock Basic White cardstock Poppy Parade ink Memento Black ink Black Matte Dots Stampin' Seal Painted Poppies stamp set Prized Peony stamp set (sentiment) Forever Fern stamp set (sentiment)  

Peony two ways

Image
I issued a colour question on my Facebook page the other day, and it was even, so I decided to do something with both colours! Check out the Facebook Live video here . The first card was done using the Prized Peony Stamp set. The image was stamped in Versamark on Cherry Cobbler, and embossed with clear embossing powder. The corners were rounded with the Detailed Trio Punch, and adhered onto a 4 1/4 x 5 1/2" piece of Very Vanilla cardstock. The sentiment was stamped in Memento Black.  The second card was stamped using Smoky Slate, on a piece of 4 x 5 1/4" Very Vanilla cardstock and then heat embossed with clear embossing powder. It was coloured using Calypso Coral and Old Olive watercolour pencils, and blended with the blender pen. The Detailed Trio punch was used for the corners, and the sentiment was stamped with Smoky Slate. It was layered onto a 4 1/4 x 5 1/2 piece of Calypso Coral cardstock.  Thanks for reading! Happy crafting!

Sweet and simple summer cards

Image
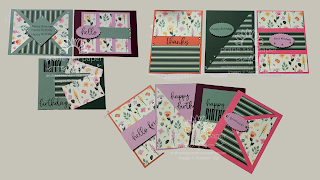
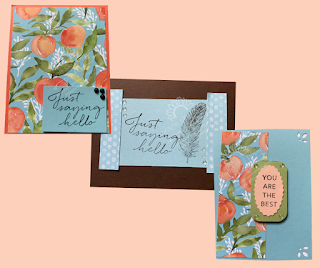
Today, I decided to use the You're a Peach designer series paper to create these sweet cards, which can be given in a set as a year-end thank you gift to teachers, or school staff. Check out the video here! Most of the colours in the Subtles colour family coordinate with this set. For my samples, I used Calypso Coral, Balmy Blue, Pear Pizzazz, Petal Pink, and Early Espresso. The stamp set used was Tasteful Touches , stamped in Memento Black . I cut the paper pack into 6 x 6" squares, and chose one of the pieces for the three cards. When you're cutting the paper, you'll need to decide if you are going to create vertical or horizontal cards, based on the pattern. The decision isn't as crucial if the paper has a non-directional pattern.  The largest piece was adhered onto a 4 1/4 x 5 1/2 piece of Calypso Coral cardstock, and a 2 1/2 x 1 3/4 piece of Balmy Blue was used for the sentiment. Matte black dots were used to ground it. The centre card was created by st...

Quick gift bag and card

Image
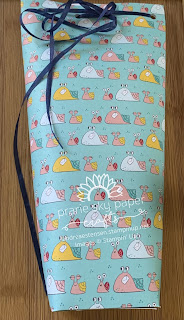
End of the school year will soon be upon us... here's a super quick idea for a square bottom tube bag, and a card.  For this project, you'll need:  a 12 x 12" sheet of patterned paper Ribbon Adhesive Stamp set Ink pad Stamp block Hole Punch Paper trimmer 3 x 6" piece of cardstock 3 x 3" envelope Check out the video project here . First, you need to score and cut your paper. Score the bottom edge horizontally at 2 1/2 inches, then, vertically, score to the horizontal line at 2 1/2, 5, and 7 1/2 inches. At the 10 inch mark, score the full length, and then trim at 10 1/2 inches. With scissors, cut the partial score lines, and reserve the 1 1/2 inch strip you cut off for the card. You can cut off the little rectangle where the tab becomes the seal of the box. Once you have cut the bottom score lines, place adhesive in two or three rows on each panel, ensuring you do not place adhesive on the inside panel. Also place a strip of adhesive along the tab. (tip: I us...

Let's get a little messy!

Image
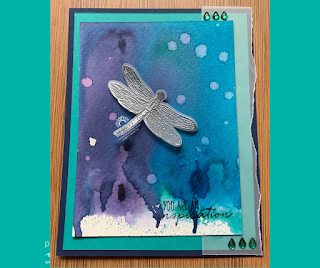
Remember when you were a kid, and you'd get good and mucky when creating? That's how I have been feeling the past few weeks when I have been creating in the craft room. Soft pastels, ink, and now this- a fun watercolour background technique using reinkers.  It looks like a hot mess when you're doing it, and it's a bit of a surprise as you wait for the paper to dry, made faster with the heat tool, but still... it's a different look every time.  Check out the YouTube video here . To create this background, I used Night of Navy, Bermuda Bay, and Pacific Point reinkers. Apply the ink to a sheet of acetate, spray the sheet with water, and spray the Fluid 100 watercolour paper as well, and apply it to the acetate wet side down. Dry with a heat tool, or let air dry, and then add a few drops of water by dipping your fingers into water and sprinkling it onto the card.  The dragonfly was done using Pacific Point ink on vellum, and then heat embossing with silver emb...

One Sheet Wonder- Ice Cream

Image
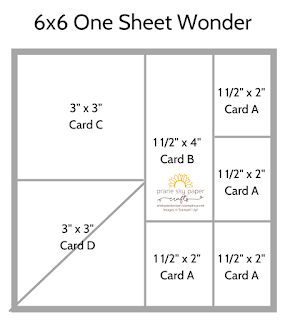
Hands up if you love one sheet wonders (OSW)... I absolutely love them. With one cutting template, you can create multiple cards with the same paper, but totally different looks.  In my monthly product share, I include a 6x6 one sheet wonder template, and I have offered them to my newsletter subscribers ( if you'd like to subscribe, click here ). In today's Facebook Live over on my page, I created a 6x6 OSW, and made four cards out of one 6x6. Cutting one 12x12 would make 16 cards- pretty good bang for your buck, I'd say!  For this template, you're going to cut one strip at 1 1/2", and then cut that strip to 2" lengths.The second strip is going to be cut at 1 1/2" and one cut made at the 4 inch mark. The remaining 3" piece will be cut at the 3" mark, and one of the squares will be cut at the diagonal.  For this set of cards, I chose to use the Ice Cream Corner designer series paper from Stampin' Up. It'll be retiring at the end of June,...

Fun, funky backgrounds

Image
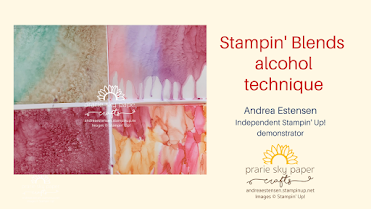
 There's nothing I love more than a good background technique. Especially one that allows creativity, and uniqueness. This, my friends, fits the bill 100%. Even if you use the same colours, you'll get a different look every single time. All you need for this technique is a few Stampin' Blends alcohol markers, rubbing alcohol (I used 70%), and a Stampin' Mister, or spray bottle. You may want to open a window if you're doing more than a couple of these, because the air does get a little heavy with the scent. Additional tools needed include a heat tool, but you can let them air dry if you like, some embossing powder, and a stamp set. Let's get started! Be sure to check out the whole video HERE.  This card is my favourite. Put the colour on the card in a circular motion at the top, then tilt the card before you spray with the rubbing alcohol. As it runs down the card, apply heat to speed the trying process and capture the runny look. I then adhered the vellum to Ba...

Sketch Saturday

Image
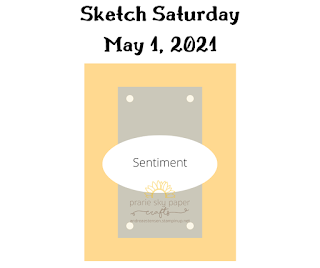
     Happy Saturday! I hope you've had a good week, and are ready to get crafty. This week, I've created a fairly straightforward sketch.  Each week, I will be posting a different sketch, along with three samples. One will be clean and simple, one slightly more stepped up, and the third will be more detailed.  My hope is that you will take the original design, and put your own spin on it, like I have.  I love sharing the creative journey with you,  and hope you'll play along!     Supplies used Crushed Curry cardstock cut at 4 1/4" x5 1/2" Snail Mail patterned paper cut at 3 1/4" x 4 1/2" A scrap of the same paper punched with the Double Oval Punch Art Gallery stamp set for the sentiment, which was stamped in Memento Black ink. Stampin' Seal adhesive Adhere the Snail Mail layer to the Crushed Curry piece, and add the stamped sentiment to the Snail Mail layer. Add rhinestones to each corner.  Supplies used Basic White cardstock cut at...