Crafting on the go
When we were home for the summer, I would also run a card class, so that meant bringing everything I would need for that. Usually, it involved a tote full of crafting goodies. I got REALLY good at packing, and using up every inch of space.
If you're going on a road trip, want something to keep you busy while you wait for an appointment, or just need something for a rainy (or too hot) day, a grab and go kit is the way to go!
Check out the video to see everything that went into my kit.
Now, the absolute easiest way to accomplish this is with one of the Kit Collection kits- it includes everything you need, and the only extras you might want to tuck into the box is a stamp block, and pair of snips. Paper Pumpkin is also a great on-the-go kit, and with the first kit you get, you'll receive a block that fits every stamp in the kit.
You can also create your own crafting survival kit, and customize it to whatever you want to create, the space available, and the person who will be doing the creating.
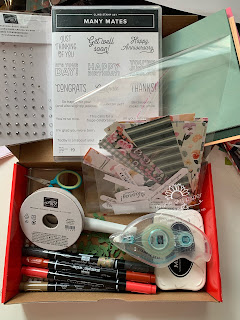
Some things you might want to include in your kit:- cut and scored card bases
- card mats (4 1/4 x 5 1/2)
- patterned paper cut to size (I took a 6x6" piece and cut a 3/4" strip from the bottom, then cut the remaining piece at 4", which left a 2" strip as well.
- stamp set and block
- ink pad(s)
- watercolour pencils, Stampin' Write markers, Stampin' blends
- punched and/or die cut shapes, stamped sentiments
- ribbon/ twine
- adhesive (Stampin' Seal, dimensionals, glue dots, liquid glue
- extra pieces from Paper Pumpkin kits
- bling
- scissors/trimmer
- envelopes
- Take Your Pick tool
- Wink of Stella
Having pieces already die cut or punched and stamped allows for quick, on the go crafting. You can also create card fronts while you're away from your crafting space and have them ready to finish off when you get home.
Some helpful tips for getting the most from your travel kit, and to ensure that everything stays clean and dry:
- Place ink pads, markers, glue, and anything else that can spill or leak in a zip top bag.
- Keep all your die cut pieces in a baggie. The packaging from bling, die sets, punches, etc can be repurposed to keep them together.
- Keep your paper clean and dry by placing it in a baggie as well. If you use the clear envelopes, they can also be used to mail your cards.
- The replacement stamp cases can also be used to store papers, embellishments, and a myriad of other supplies.


Comments
Post a Comment