Posts

Fun, funky backgrounds
Image
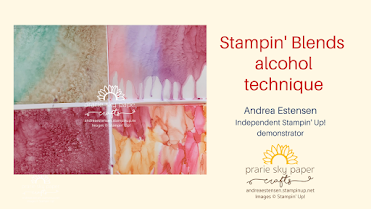
 There's nothing I love more than a good background technique. Especially one that allows creativity, and uniqueness. This, my friends, fits the bill 100%. Even if you use the same colours, you'll get a different look every single time. All you need for this technique is a few Stampin' Blends alcohol markers, rubbing alcohol (I used 70%), and a Stampin' Mister, or spray bottle. You may want to open a window if you're doing more than a couple of these, because the air does get a little heavy with the scent. Additional tools needed include a heat tool, but you can let them air dry if you like, some embossing powder, and a stamp set. Let's get started! Be sure to check out the whole video HERE.  This card is my favourite. Put the colour on the card in a circular motion at the top, then tilt the card before you spray with the rubbing alcohol. As it runs down the card, apply heat to speed the trying process and capture the runny look. I then adhered the vellum to Ba...
Sketch Saturday

Image
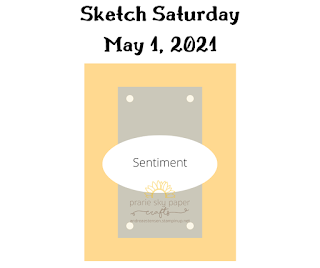
     Happy Saturday! I hope you've had a good week, and are ready to get crafty. This week, I've created a fairly straightforward sketch.  Each week, I will be posting a different sketch, along with three samples. One will be clean and simple, one slightly more stepped up, and the third will be more detailed.  My hope is that you will take the original design, and put your own spin on it, like I have.  I love sharing the creative journey with you,  and hope you'll play along!     Supplies used Crushed Curry cardstock cut at 4 1/4" x5 1/2" Snail Mail patterned paper cut at 3 1/4" x 4 1/2" A scrap of the same paper punched with the Double Oval Punch Art Gallery stamp set for the sentiment, which was stamped in Memento Black ink. Stampin' Seal adhesive Adhere the Snail Mail layer to the Crushed Curry piece, and add the stamped sentiment to the Snail Mail layer. Add rhinestones to each corner.  Supplies used Basic White cardstock cut at...

January Paper Pumpkin alternatives

Image
Today, I did a Facebook Live showing the January Paper Pumpkin kit. Here are the alternatives. This one used the full red base, and was created as shown (mostly) in the instructions. Bow tying is a challenge for me, so I placed the ribbon behind the tag, and adhered the tag to the card. Simplicity at it's best. The heart stamp was used in the centre of the foiled heart, love stamped in all four corners, and the corner rounder punch was used on the card before adhering it to the card front. The pink striped piece is cut at 4x5.25 and adhered to the front of a 5.5 x 4.25" scored card base. The enamel hearts were coloured with the dark Real Red Stampin' Blends marker. Ribbon use at it's best. The ribbon was folded back and forth and adhered to the back of the mailbox card. Enamel stars and one enamel heart were stuck to the front, and then the focal image was placed on the card front. This one is probably my favourite for its simplicity. The heart stamp was inked in Poppy...

How to use water colour pencils

Image
Do you love colouring? There are so many options with Stampin' Up!, and today, we're going to explore the watercolour pencils.  For any colouring medium that requires water, or another liquid to move the colour around on the paper, you need to stamp your image in a medium that doesn't react with water. I used Stazon for the snail image, and added a bit of colour with the pencils. Let me know what you think!       If you're in Canada, shop with me! Subscribe to my YouTube channel   Follow me on Pinterest    If you'd like to subscribe to my newsletter

Unboxing day 2020!

Image
 Thanks for stopping by my blog! I hope you had a good holiday. Christmas 2020 was certainly different, but was still quite nice. We had a fairly quiet, laid back day. While we missed family and friends, we had an enjoyable day, and the kids were able to play with their new treasures.  I spend part of my holiday cleaning up and organizing my craft room. I promised myself that nothing would be unboxed from my Stampin' Up! pre-order until it was done. Thankfully my husband was a willing assistant, and did most of the heavy lifting for me, and I can now see all of the surfaces in my craft room again.  This morning, I did my unboxing during a Facebook live on my page. Check it out if you don't already follow or like it- I've got loads of project ideas, and fun planned for the next few months!      Which product(s) are on your wishlist?  

Self-closing wing box

Image
Today's project is a self-closing box.Fairly straight forward, all you need is some cardstock, patterned paper, and tape. And, of course, something to put in the box ;) Check out the video for full instructions! Here's the instruction sheet:

Hanging treat holder

Image
I'll be creating all kinds of fun, easy projects for you to gift to family and friends this year. I hope you enjoy the time in your craft space, and take the time to get creative. Let me know what kinds of projects you like, and I'll work on getting more tutorials prepared! Let's get started.  For this project, you'll need: Cardstock (3" x 5 1/2") Patterned paper (5 1/2" x 1 1/2") Coordinating paper scrap for the sentiment Tag punch Oval dies or punch Stamp set Stamp block Bone folder Ink Check out the video tutorial here. Step 1) Score the cardstock on the 3" side at 1/2" and 2 1/2"              Score the 5 1/2" side at  2 1/2 and 3" Step 2) Burnish the score lines with the bone folder, and fold the two short sides under. Punch both ends with the tag punch (Delightful Tag punch used here) Step 3) Trim the four side pieces so they are straight, and cut the four centre tabs to the score lines. Step 5) Put adhesive on o...