Sunday Simple Stamping #simplestamping
Hello! Thanks for stopping by!
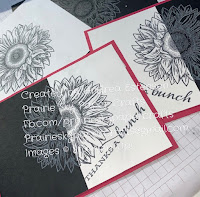
It was raining this morning when I got up... what better thing to do than head to the craft room and create. And, when it's dreary out, sunflowers still bring a smile to my face- even in basic black and white.
Today's project is super easy, though the second version might look a little complex, it really isn't.
Let's jump right in!

You'll need: Basic Black cardstock, Whisper White cardstock, and a third colour of your choice (I used Real Red). You'll also need Tuxedo Black Memento ink, and whisper White Craft ink, a stamp of your choice, stamp block, adhesive and a paper trimmer.
** I used my Stamparatus for this project, to get both sunflowers positioned exactly where I wanted it to be, but you can use a stamp block, and trim the finished image.
 Cut your cardstock to 4 1/4 inches by 5 1/2 inches. Stamp your image twice- once with Momento on Whisper White, then once in Whisper White on Basic Black. Be sure to wash your stamp in between impressions, or you'll end up with a gray ink pad. Also, be sure to dry it well, or the next impression won't be clear. I like to dab it with a shammy to make sure it's dry, and also, with the shammy, you won't get any wayward fibers on your stamp.
 Once the image is stamped, cut it in half at 2 3/4 inches with your trimmer. Apply adhesive all four sides. If you are using glue, be sure not to put it too close to the edge to avoid overflow when you put the two pieces together.
Place one half of your image onto a second 4 1/4 by 5 1/2 inch piece of Whisper White card stock. Take the second piece and line it up with the first. The easiest way to do this is to line the piece up with the first one, holding it at about a 45 degree angle. That way, you can ensure it's lined up before you adhere it to the base. Press down once it's lined up, and repeat the process with the second card.
You may have to trim your cardstock down to get rid of any edges that are not perfectly even. To do this, I trimmed 1/8 of an inch off each side (for the math challenged like me, that is the mark between the 1/4 inch marks on your trimmer- it took me longer than I care to admit to grasp that concept!) When you finish trimming, your card front will be 4 by 5 1/4 inches. Grab your colour cardstock and place your image on it. You can also just put it straight onto your card base. Your base is half a sheet of cardstock, cut either at 4 1/4 by 11 1/2 inches, or 5 1/2 by 8 1/2 inches folded in half.
 Now, all that's left to do is to select the lucky person to get your handmade creation! Share your cards in the comments below, or show them off on my Facebook page, too!
 I've got a class coming up soon featuring Celebrate Sunflowers. If you'd like info, send me an email!email! If you'd like to get my email newsletter, which often has exclusives just for subscribers, let me know!
Happy crafting!
Andrea
Andrea


Comments
Post a Comment