Which ink for which colouring medium?
 |
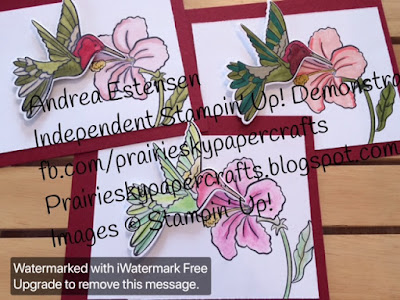
| Top left was coloured with Stampin' Blends.Top right was coloured with Stamp n' Write markers.Bottom was coloured with watercolour pencils and a blender pen. |
I love colouring. Adding dimension and my own touch to the cards I make is relaxing, and I can customize it however I want. Stampin' Up! has a few different colouring mediums, but they all require a little bit of knowledge before you get started.
One of the first questions I usually get asked is how do I know what ink to use? Watercolour, colouring pencils and Blends (alcohol markers) are unique, and require their own starting points.
Here's a breakdown of the different inks.
Classic Stampin' ink: can be used for general stamping (stamping directly onto paper). This ink is waterbased. It cannot be used for any colouring medium involving water or blender pens. However, you can pick up the ink with an aquapainter or blender pen and apply colour to your image.
Craft Stampin' ink: can be used for heat embossing* and stamping on dark cardstock for an opaque look. This is a pigment ink, and dries slowly. Drying and be expedited by a heat tool.
Memento ink: can be used for general stamping (stamping directly onto paper). Can be coloured with Stampin' Blends for no-smear colouring. This is a water-based ink, so shouldn't be used with watercolour or blender pen colouring.
Stazon ink: this is a permanent ink, used for stamping images for watercolouring with aquapainters, or blender pens. You can also use it to stamp on window sheets, vellum and cellophane, as well as any other non-porous surfaces (like tiles and cups).
Versamark ink: is a watermark pigment ink. Doesn't have any colour. Can be used for heat embossing*.
*- if an item is heat embossed, then there is no worrying about the ink smearing. Heat embossed images can be coloured with any medium, however, you do need to be careful that you not get too close to the embossed lines, or the colour can be picked up by the embossing powder.
As you can see from the image above, using the different colouring mediums can give your card a totally different look, as can the paper they are stamped on.
For all the of the images, I used Whisper White cardstock. Had I used watercolour paper for the markers and watercolour pencils, it would have had a different look as well.
I find the watercolour pencils very forgiving, and they are usually my go-to colouring tool. The vibrancy depends on how much colour you add, as well as how much you blend them. My prefered technique is to lay the colour down along the border (not too close) of the image, and then, using circular motions, bring the colour toward the centre.
The Stampin' Blends are incredibly easy to use, though it can take some time to get used to them. They can bleed over the edges of your image, so it is advisable to not go directly to the edge of the stamped image. You can get a colour lifter pen, which can help lighten your image, or fix slight mistakes if your colour does bleed over the edge. I like to use the Blends with long brush strokes (if it is a narrow area) or, in a circular motion as well. I find that circular motions helps hide the lines, and helps with blending, especially if you are trying to blend more than two colours.
The markers, used without water or a blender pen, are very vibrant, and can be blended together to create the look you want. You can also use them like watercolour paints, by scribbling on a piece of plastic and picking up the colour with a blender pen or aquapainter. If you don't have markers, the ink pads can be used the same way. Just apply colour to a non-porous surface (I like using a window sheet for easy clean up). If I am using an aquapainter, I prefer to dip it into water, then take the excess off on a paper towel. Then, I pick up the colour and brush from the inside to outside using long strokes. You can add colour on top of colour, too, to increase vibrancy. I like to also take a piece of paper towel and dab the excess water off my image, being careful not to smudge it.
Ink up a stamp, grab some colouring tools and have a fun time playing to see what you can come up with. There's a reason adult colouring is such a hit lately. It's time to bring your inner kid back out, and do something just for you!
I hope you've found this helpful. Please follow my blog for more indepth projects, and tutorials. I've got two in the works that I am planning to have up soon!
Happy crafting!


Comments
Post a Comment