Posts

12 Crafts of Christmas- day 6 recipe book

Image
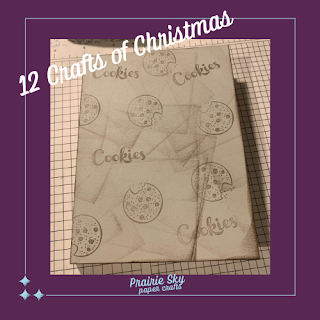
Wow. We're halfway through our 12 Crafts of Christmas already! Today, I have a sweet recipe book for you to give to a loved one. Envelope books are quick and easy, and can be used for a variety of things, including recipes, photos, mini scrapbooks, and more.  The Nothing's Better Than stamp set is the perfect one for this project, and, you can amp up your project using the coordinating dies.  For this project, you'll need envelopes, card stock, patterned paper, and adhesive. It really does come together quickly and easily once you stack the envelopes.  For the cover, simply measure your envelopes, and add 1/4 inch to the height and width of the cardstock, and then measure the spine to figure out the score line for that.  If your envelopes are 4 1/4 x 5 1/2, with a 1/2 inch spine, your cardstock would be cut to 5 3/4x 9, and scored at 4 1/2, and 5. Check out the video here. Check out all of our projects as the 12 days continue here: bit.ly/3oXmsLB For more ideas and i...

12 Crafts of Christmas day 4

Image
Welcome back for day four of the 12 Crafts of Christmas collaboration! I loved Stephanie's project yesterday. Today, I am working on a card that is simple and sweet. Using the Gingerbread and Peppermint designer series paper, and an idea from a card in the holiday catalogue, this card comes together quickly and easily.  It's simply paper, layered with the mittens cut out of the paper, a tag with a sentiment attached, and some ribbon. Check out the video here. Check out all of our projects as the 12 days continue here: bit.ly/3oXmsLB For more ideas and inspiration, be sure to check out my other s ocial media channels here .

12 Crafts of Christmas- Day 2

Image
  My friend Stephanie from Chalk Couture and I are doing a 12 Crafts of Christmas collaboration over the next little bit. This is my project, which can be added to her snowman soup cup from yesterday.  The Snowman Season stamp, coloured with watercolour pencils is a cute and quick card on its own, but when you add a little bit of heat embossing with white embossing powder, it adds a little bit more interest and texture to the card.  Check out the video here: https://youtu.be/y8RoAFZmKLc Check out all of our projects as the 12 days continue here: bit.ly/3oXmsLB Supplies used: Snowman Season stamp set, Memento Tuxedo Black ink, versamark, white embossing powder, gems, Night of Navy cardstock, Basic White cardstock, watercolour pencils, Stampin' Trimmer.

How does it measure up?

Image
Measure twice, cut once. We've all heard that saying. And, over the years, I have learned that sometimes, it takes more than two measures to get it right ! There are some measurements that are easy to figure out, but when you get to some fancy folds, or 3D items, you need to get familiar with the smaller increments- and that sometimes can be a challenge. I know it is for me!  If you're new to cardmaking, this handy guide will help you out, too. You can check out the video here. Most of the time, card and scrapbook design measurements in North America are given in inches. It can get tricky when you’re not sure what the tick marks on the Stampin' Trimmer mean. I have been paper crafting for ages, and I still need to count, and recount, before I cut anything that isn’t the typical 1/4 or 1/2 inch measures. The diagram shows the ruler on the Stampin’ Trimmer, which measures to 1/16 of an inch. The 1/16 measure is the shortest, then 1/8”, 1/4”, 1/2” and the one inch mark is the ...

I had an idea...

Image
I was thinking about ways to use some of the new product in the fall and winter Stampin' Up! mini catalogue, when an idea hit.  The texture and interest the Snowy White velvet paper lends to projects is amazing. I loved the red velvet in last year's, and I think I love the white even more. Granted, I was a little nervous, because velvet attracts every bit of fluff near it, and white... well, let's just say my accident-prone self doesn't own anything white.  Enter the idea. I wanted to create a snowy background with dimension. I grabbed my Basic Boarders dies, cut out the clouds on a piece of scrap, and used that for the base. Then I grabbed my blending brushes, Balmy Blue and Grey Granite ink pads, and did the sky and snow. You can check out the video here .  Once the sky and snow were inked, the snowflakes were stamped with Balmy Blue ink, and then the snowman was assembled and adhered to the velvet paper with dimensionals.  Three pieces of mesh ribbon were added to...

One sheet wonder

Image
One sheet wonder cards are so much fun to make. This template will create 10 cards. I have added coordinating cardstock, as well as some Basic Rhinestones to add some shine. The Double Oval Punch was also used for some of the cards. All the sentiments were stamped in Memento Black ink.  You can download the cutting template here . The layout is here . In my video, I referenced the cost of making your own cards. Check out the video on YouTube . Breaking it down: 2021-2023 In Colour cardstock- $12.25 (20 sheets, 8 1/2 x 11") Basic White cardstock-  $13.25 (40 sheets, 8 1/2 x 11") Designer Series Paper $15.75 (12 sheets, 12 x 12") Clear envelopes $8.25 (50) Basic White envelopes $10.25 (40) You can get 80 cards from a pack of Basic White cardstock, which could create several cards. If you paired the carstock with a stamp set that has sentiments for many occasions, like Peaceful Moments ($29), you can quickly and easily make cards for any occasion. The cost for 80 cards, inc...

Designer Series Paper 12 x 12 gift holder

Image
 Quick and easy project for you today- no cutting, no stamping, and you'll end up with a nice, large gift bag. Check out the video here. It'll take you about 10 minutes, and you'll be out the door with a unique bag in hand.  Supplies needed:  12 x 12 sheet of Designer Series Paper (Pansy Petals and In The Wild were used for the examples.) Ribbon Scissors Adhesive (I used Stampin' Seal) Hole punch Take your piece of 12 x 12 paper, and score horizontally at 2 inches on the top and bottom. Score vertically from the edge of the paper to the 2" score line at 3 3/4", 7 1/2", and 11 1/4".  Pinch the score lines so they are visible, and then run tape or glue from the top to bottom of the paper on the 3/4 inch tab. Line up the left side of the paper to the score line, and press to create a tube (ensure the tab is on the inside of the tube. Pinch the tabs together, and then punch one hole roughly in the centre of each- there will be three holes on each end. Th...